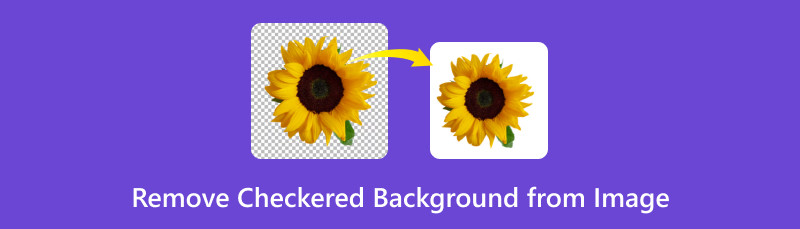
3 படங்களிலிருந்து சரிபார்க்கப்பட்ட பின்னணியை எவ்வாறு அகற்றுவது என்பது பற்றிய பயனுள்ள அணுகுமுறைகள்
சில நேரங்களில், சரிபார்க்கப்பட்ட பின்னணியுடன் நீங்கள் காணக்கூடிய சில படங்கள் உள்ளன. PNG படக் கோப்புகளில் இந்தப் படங்களை நீங்கள் பொதுவாகக் காணலாம். ஒரு சரிபார்க்கப்பட்ட பின்னணி சில நேரங்களில் தொந்தரவு செய்யலாம். படத்தைத் திருத்துவதற்கும் நல்ல பின்னணியைச் சேர்ப்பதற்கும் இது பயனர்களைத் தடுக்கலாம். எனவே, புகைப்படத்திலிருந்து சரிபார்க்கப்பட்ட பின்னணியை அகற்ற விரும்பும் பயனர்களில் நீங்கள் இருந்தால், நீங்கள் சரியான கட்டுரையில் உள்ளீர்கள். இந்த இடுகையில், பல்வேறு சரிபார்க்கப்பட்ட பின்னணி நீக்கிகள் மற்றும் விரிவான படிகளை நாங்கள் உங்களுக்கு வழங்குவோம். எனவே, நீங்கள் ஆர்வமாக இருந்தால், இந்த வழிகாட்டியை சரிபார்க்கவும், உங்களுக்கு தேவையான அனைத்தையும் நாங்கள் வழங்குகிறோம், குறிப்பாக எப்படி படங்களிலிருந்து சரிபார்க்கப்பட்ட பின்னணியை அகற்றவும்.
- பகுதி 1. ஆன்லைனில் ஒரு படத்திலிருந்து சரிபார்க்கப்பட்ட பின்னணியை எவ்வாறு அகற்றுவது
- பகுதி 2. ஃபோட்டோஷாப்பில் சரிபார்க்கப்பட்ட பின்னணியை அழிப்பது எப்படி
- பகுதி 3. Fotor இல் உள்ள செக்கர்டு பின்னணியை எவ்வாறு அகற்றுவது
- பகுதி 4. படத்திலிருந்து சரிபார்க்கப்பட்ட பின்னணியை அகற்றுவது பற்றிய அடிக்கடி கேட்கப்படும் கேள்விகள்
பகுதி 1. ஆன்லைனில் ஒரு படத்திலிருந்து சரிபார்க்கப்பட்ட பின்னணியை எவ்வாறு அகற்றுவது
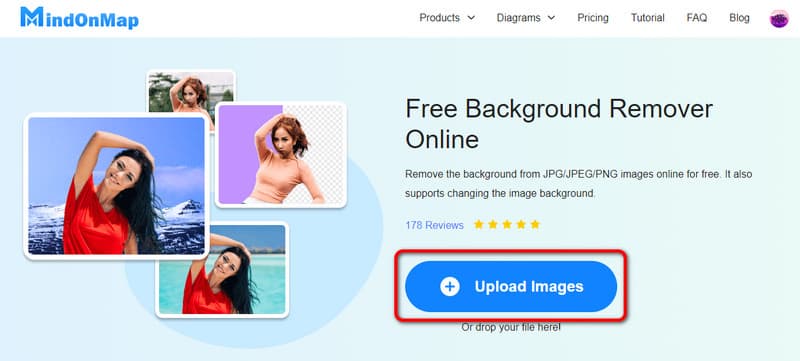
உங்கள் படங்களில் செக்கர்டு பின்னணி இருப்பது கவலையளிக்கவில்லையா? சரி, உங்கள் புகைப்படத்தைத் திருத்துவது மற்றும் சில தடைகளுடன் அதை மேம்படுத்துவது சவாலாக இருக்கலாம். எனவே, உங்கள் புகைப்படங்களிலிருந்து சரிபார்க்கப்பட்ட பின்னணியை அகற்ற சிறந்த வழியைத் தேடுகிறீர்களா? அந்த வழக்கில், பயன்படுத்த சிறந்த கருவி MindOnMap இலவச பின்னணி நீக்கி ஆன்லைன். இந்த இணைய அடிப்படையிலான பின்னணி நீக்கியை இயக்கும்போது, உங்கள் படக் கோப்பிற்கு நீங்கள் விரும்பும் எந்த இலக்கையும் அடையலாம். புகைப்படத்திலிருந்து இடையூறு விளைவிக்கும் சரிபார்க்கப்பட்ட பின்னணிகளை சீராக நீக்குவது இதில் அடங்கும். பின்னணியை அகற்றும் செயல்முறையின் அடிப்படையில், கருவி சரியானது. பின்னணியை கைமுறையாக அகற்ற, Keep மற்றும் Erase செயல்பாடுகளைப் பயன்படுத்த இது உங்களை அனுமதிக்கிறது. சிறந்த அனுபவத்திற்காக நீங்கள் தூரிகை அளவையும் சரிசெய்யலாம். மேலும் என்னவென்றால், ஆன்லைன் கருவி அதன் தானாக அகற்றும் செயல்முறையின் உதவியுடன் உங்கள் பணியை எளிதாக்கும் திறன் கொண்டது. படத்தைப் பதிவேற்றிய பிறகு, கருவி தானாகவே படத்தின் பின்னணியை அகற்றும் திறன் கொண்டது, இது பயனர்களுக்கு மிகவும் வசதியானது. சரிபார்க்கப்பட்ட பின்னணியை அகற்றுவதைத் தவிர, MindOnMap அதன் Cropper அம்சத்தையும் வழங்குகிறது. இந்த அம்சத்தின் மூலம், உங்கள் படங்களிலிருந்து தேவையற்ற பகுதிகளை அகற்றலாம், அது விளிம்பில் அல்லது மூலையில் இருந்தாலும் சரி. கடைசியாக, நீங்கள் வெவ்வேறு ஆன்லைன் தளங்களில் MindOnMap ஐ அணுகலாம். இதில் Google, Opera, Safari, Edge, Mozilla மற்றும் பல உள்ளன. எனவே, PNG மற்றும் பிற கோப்புகளிலிருந்து சரிபார்க்கப்பட்ட பின்னணியை அகற்றுவதற்கான பயனுள்ள வழிகளில் நீங்கள் ஆர்வமாக இருந்தால், கீழே உள்ள பயிற்சிகளைப் பார்க்கவும்.
உங்கள் சாதனத்தில் எந்த உலாவியையும் திறக்கலாம், அதன் இணையதளத்திற்குச் செல்லலாம் MindOnMap இலவச பின்னணி நீக்கி ஆன்லைன். மையத் திரையில் இருந்து படங்களைப் பதிவேற்று பொத்தானைக் கிளிக் செய்து, உங்கள் கணினி கோப்பு கோப்புறையிலிருந்து சரிபார்க்கப்பட்ட பின்னணியுடன் படத்தை உலாவவும்.
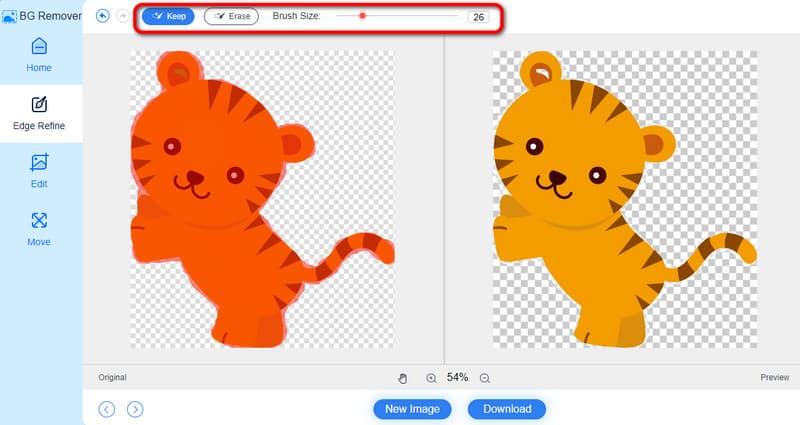
பதிவேற்ற செயல்முறைக்குப் பிறகு, கருவி தானாகவே சரிபார்க்கப்பட்ட பின்னணியை அகற்றுவதை நீங்கள் காணலாம். ஆனால் பின்னணியை கைமுறையாக இருமுறை சரிபார்த்து அகற்ற விரும்பினால், நீங்கள் Keep மற்றும் Erase செயல்பாட்டைப் பயன்படுத்தலாம். நீங்கள் தூரிகை அளவையும் சரிசெய்யலாம்.
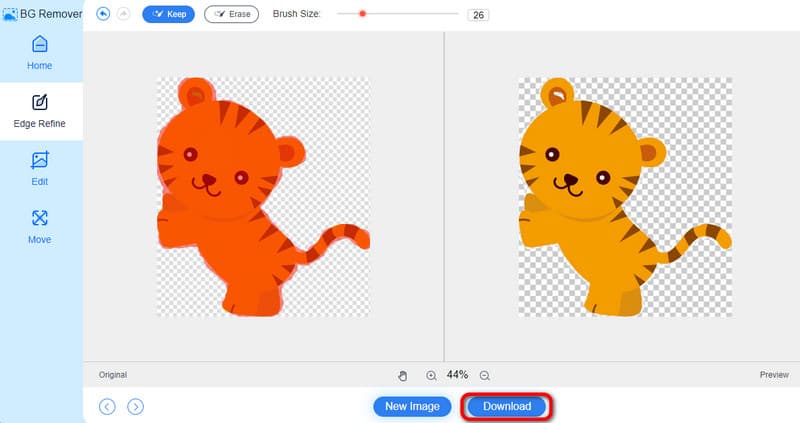
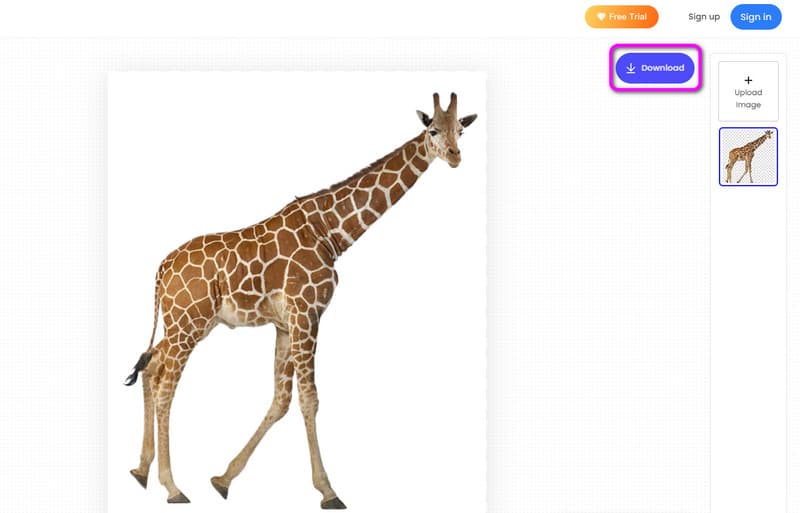
உங்கள் இறுதி முடிவில் நீங்கள் திருப்தி அடைந்தால், கடைசியாக செய்ய வேண்டியது உங்கள் கோப்பைச் சேமிப்பதாகும். கீழ் இடைமுகத்திலிருந்து, பதிவிறக்கம் செயல்முறையைத் தொடங்க பதிவிறக்க என்பதை அழுத்தவும். சில வினாடிகளுக்குப் பிறகு, உங்கள் கணினியில் உள்ள படக் கோப்பை நீங்கள் ஏற்கனவே சரிபார்க்கலாம்.
பகுதி 2. ஃபோட்டோஷாப்பில் சரிபார்க்கப்பட்ட பின்னணியை அழிப்பது எப்படி
ஒரு படத்திலிருந்து சரிபார்க்கப்பட்ட பின்னணியை அகற்றி மாற்ற ஆஃப்லைன் வழியை நீங்கள் விரும்பினால், நீங்கள் பயன்படுத்தலாம் அடோ போட்டோஷாப். விண்டோஸ் மற்றும் மேக் கணினிகளில் நீங்கள் பெறக்கூடிய பிரபலமான மேம்பட்ட பட எடிட்டிங் மென்பொருளில் இதுவும் ஒன்றாகும். இது அதன் மேம்பட்ட செயல்பாடுகளைப் பயன்படுத்தி உங்கள் சரிபார்க்கப்பட்ட பின்னணியை திறம்பட நீக்கி மாற்றும். சரிபார்க்கப்பட்ட பின்னணியிலிருந்து விடுபட, அதன் வெளிப்படைத்தன்மை அமைப்புகளைப் பயன்படுத்தலாம். அதைத் தவிர, நிரலைப் பயன்படுத்தும் போது நீங்கள் அனுபவிக்கக்கூடிய மற்றும் அனுபவிக்கக்கூடிய பல செயல்பாடுகள் உள்ளன. நீங்கள் விளைவுகளைச் சேர்க்கலாம், வடிகட்டலாம், சுழற்றலாம், செதுக்கலாம் மற்றும் பலவற்றைச் செய்யலாம்.
இருப்பினும், நீங்கள் தெரிந்து கொள்ள வேண்டிய சில குறைபாடுகள் உள்ளன. அடோப் போட்டோஷாப் ஒரு மேம்பட்ட எடிட்டிங் மென்பொருளாக இருப்பதால், இது ஆரம்பநிலையாளர்களுக்குப் பொருந்தாது. கற்க நேரம் எடுக்கும் படத்தின் பின்னணி நீக்கி. மேலும், இது சிக்கலான மற்றும் குழப்பமானதாக இருக்கும் பல விருப்பங்கள் மற்றும் அம்சங்களைக் கொண்டுள்ளது. எனவே, நீங்கள் தொழில்முறை அல்லாத பயனராக இருந்தால், எளிதான இடைமுகம் மற்றும் செயல்பாடுகளைக் கொண்ட மற்றொரு கருவியைப் பயன்படுத்துவது சிறந்தது. ஃபோட்டோஷாப்பில் சரிபார்க்கப்பட்ட பின்னணியை எவ்வாறு மாற்றுவது என்பதை நீங்கள் அறிய விரும்பினால், கீழே உள்ள விவரங்களைக் காணலாம்.
பதிவிறக்கி நிறுவவும் போட்டோஷாப் உங்கள் Windows அல்லது Mac கணினிகளில். அதன் அம்சங்களை அனுபவிக்க அதன் இலவச சோதனை பதிப்பைப் பயன்படுத்தலாம்.
கோப்பு > திற என்பதற்குச் சென்று உங்கள் கோப்புறையிலிருந்து படத்தைப் பதிவேற்றவும், அதை ஃபோட்டோஷாப்பின் பயனர் இடைமுகத்தில் செருகவும்.
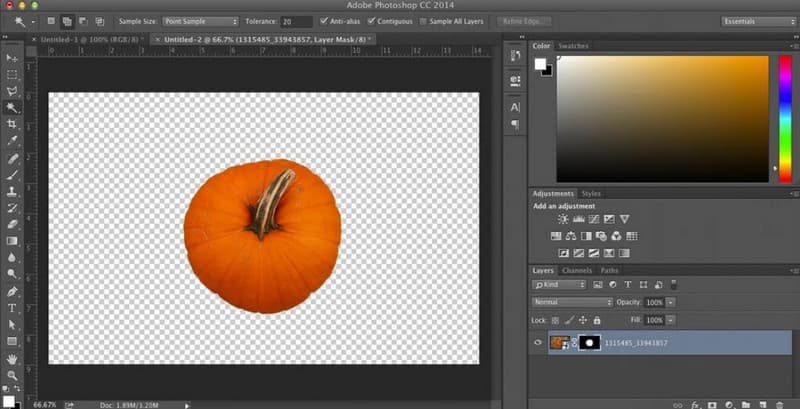
மேல் மெனுவில், என்பதைத் தேர்ந்தெடுக்கவும் தொகு பிரிவு. அதன் பிறகு, முன்னுரிமை விருப்பத்திற்கு செல்லவும் மற்றும் வெளிப்படைத்தன்மை மற்றும் வரம்பு விருப்பங்களை தேர்வு செய்யவும். முடிந்ததும், மற்றொரு இடைமுகம் உங்கள் திரையில் தோன்றும்.
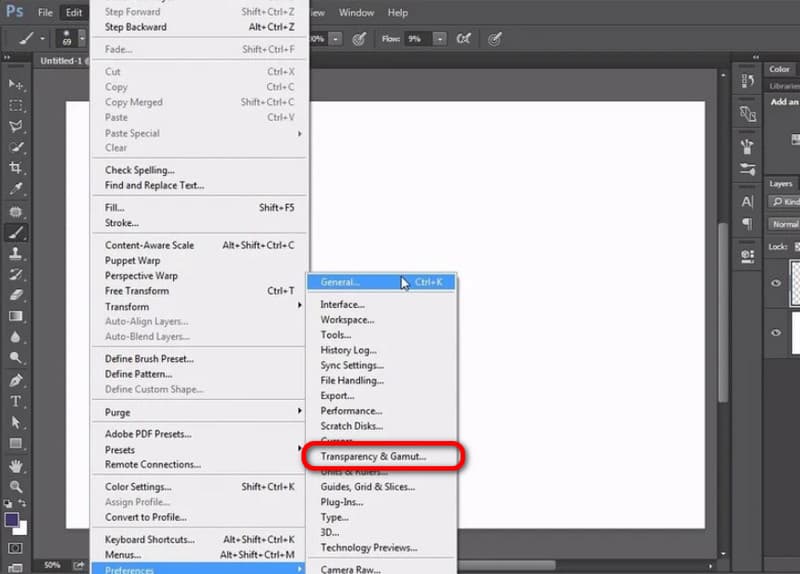
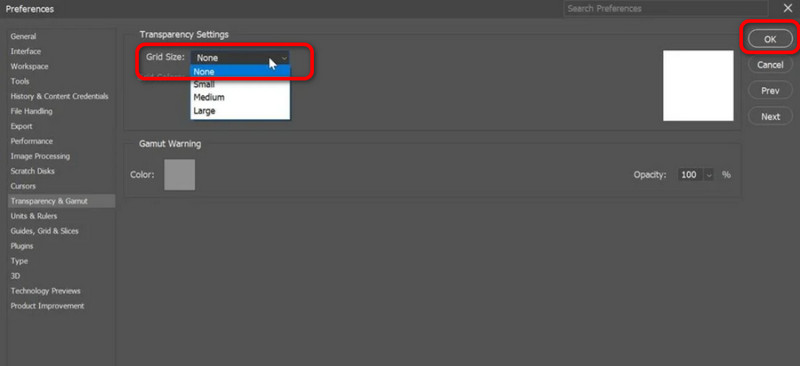
அதன் பிறகு, வெளிப்படைத்தன்மை அமைப்பு பிரிவில், கீழ்தோன்றும் பொத்தானைக் கிளிக் செய்து, எதுவும் இல்லை என்ற விருப்பத்தைத் தேர்ந்தெடுக்கவும். பின்னர், சரி என்பதைக் கிளிக் செய்யவும். அதன் மூலம், உங்கள் படத்தின் சரிபார்க்கப்பட்ட பின்னணி ஏற்கனவே அகற்றப்பட்டிருப்பதைக் காண்பீர்கள்.
பகுதி 3. Fotor இல் உள்ள செக்கர்டு பின்னணியை எவ்வாறு அகற்றுவது
உங்கள் படத்திலிருந்து சரிபார்க்கப்பட்ட பின்னணியை அகற்ற உதவும் மற்றொரு ஆன்லைன் கருவி Fotor ஆகும். இந்த கருவி மூலம், உங்கள் படத்திலிருந்து சரிபார்க்கப்பட்ட பின்னணியை திறம்பட அகற்றலாம். மேலும், இது தானாகவே பின்னணியை அகற்றி, வசதியான கருவியாக மாற்றும். கூடுதலாக, Fotor உங்கள் படங்களுக்கு பின்னணி மற்றும் வண்ணத்தை சேர்க்கும் திறன் கொண்டது. இதன் மூலம், நீங்கள் விரும்பிய முடிவை அடிப்படையாகக் கொண்டு படத்தை மேம்படுத்தலாம். இருப்பினும், இது ஒரு ஆன்லைன் கருவி என்பதால், உங்களுக்கு இணைய இணைப்பு தேவை. மேலும், இடையூறு விளைவிக்கும் விளம்பரங்கள் திரையில் காண்பிக்கப்படுகின்றன, இது பயனர்களுக்கு எரிச்சலூட்டும். கடைசியாக, நீங்கள் திருத்தப்பட்ட படத்தைப் பதிவிறக்க விரும்பினால், கருவிக்கு நீங்கள் நேரத்தைச் செலவழிக்கும் கணக்கை உருவாக்க வேண்டும். நீங்கள் இன்னும் கருவியைப் பயன்படுத்த விரும்பினால், கீழே உள்ள படிகளைப் பயன்படுத்துவது சிறந்தது.
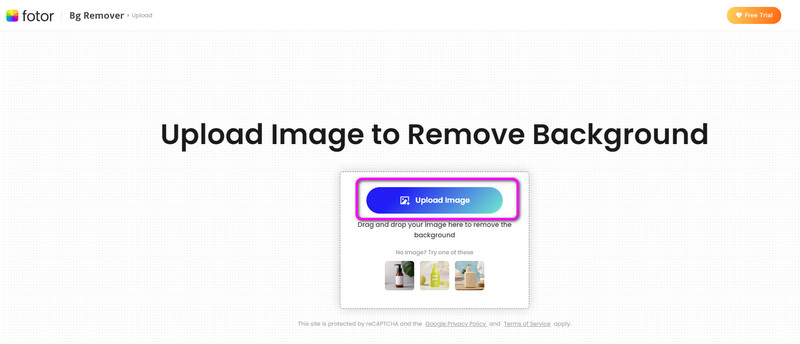
என்ற இணையதளத்திற்குச் செல்லவும் ஃபோட்டர். பின்னர், படத்தைப் பதிவேற்று பொத்தானைக் கிளிக் செய்து, நீங்கள் அகற்ற விரும்பும் சரிபார்க்கப்பட்ட பின்னணியுடன் படத்தை இணைக்கவும்.
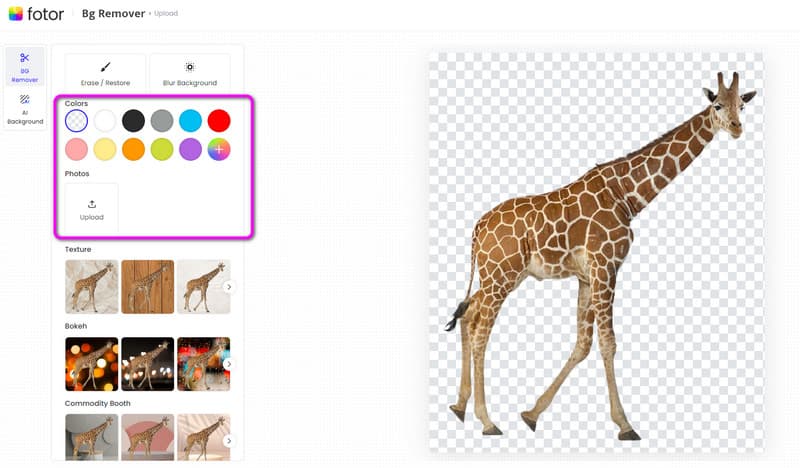
புகைப்படத்தை இணைத்த பிறகு, கருவி செயல்படும் பின்னணியை அகற்று தானாக. இடது இடைமுகத்திலிருந்து நீங்கள் விரும்பினால் பின்னணி மற்றும் வண்ணத்தையும் சேர்க்கலாம்.
இறுதியாக திருத்தப்பட்ட புகைப்படத்தைச் சேமிக்க, வலது இடைமுகத்திற்குச் சென்று பதிவிறக்க பொத்தானைக் கிளிக் செய்யவும். அதன் பிறகு, நீங்கள் ஏற்கனவே முடித்துவிட்டீர்கள்.
பகுதி 4. படத்திலிருந்து சரிபார்க்கப்பட்ட பின்னணியை அகற்றுவது பற்றிய அடிக்கடி கேட்கப்படும் கேள்விகள்
கூகுள் ஸ்லைடில் உள்ள சரிபார்க்கப்பட்ட பின்னணியை எப்படி அகற்றுவது?
உங்கள் இணைய உலாவியில் உங்கள் Google ஸ்லைடைத் திறக்கவும். பின்னர், சரிபார்க்கப்பட்ட பின்னணியுடன் புகைப்படத்தைப் பதிவேற்றவும். அதன் பிறகு, மேல் இடைமுகத்திலிருந்து ஸ்லைடு மெனுவிற்குச் சென்று, பின்புலத்தை மாற்று என்பதைத் தேர்ந்தெடுக்கவும். அடுத்த கட்டமாக வண்ணப் பகுதிக்குச் சென்று வெளிப்படையான பொத்தானைத் தேர்ந்தெடுக்கவும். பின்பு, பின்னணி ஏற்கனவே போய்விட்டதைக் காண்பீர்கள்.
சரிபார்க்கப்பட்ட பின்னணி இல்லாமல் படத்தை எவ்வாறு சேமிப்பது?
சரிபார்க்கப்பட்ட பின்னணியை நீங்கள் அகற்ற வேண்டும். இதைச் செய்ய, அணுகவும் MindOnMap இலவச பின்னணி நீக்கி ஆன்லைன். புகைப்படத்தைப் பதிவேற்றவும், அது தானாகவே சரிபார்க்கப்பட்ட பின்னணியை அகற்றும். பின்னர், சரிபார்க்கப்பட்ட பின்னணி இல்லாமல் உங்கள் படத்தைச் சேமிக்க பதிவிறக்கத்தை அழுத்தலாம்.
கேன்வாவில் சரிபார்க்கப்பட்ட பின்னணியை எப்படி அகற்றுவது?
முதலில் Canva இணையதளத்தைப் பார்வையிட வேண்டும். பின்னர், நீங்கள் திருத்த விரும்பும் படத்தை பதிவேற்றவும். திருத்து பிரிவுக்குச் சென்று, இடது பேனலில் இருந்து பின்னணி நீக்கி விருப்பத்தைத் தேர்ந்தெடுக்கவும். பின்னணியை அகற்றத் தொடங்க, அழி பொத்தானை அழுத்தவும்.
முடிவுரை
செய்ய ஒரு படத்திலிருந்து சரிபார்க்கப்பட்ட பின்னணியை அகற்றவும், இந்த இடுகையை உங்கள் சிறந்த வழிகாட்டியாகப் பயன்படுத்தலாம். இது உங்கள் முக்கிய நோக்கங்களை அடைய பல்வேறு வழிகளை வழங்க முடியும். மேலும், ஒரு படத்தில் இருந்து பின்னணியை அகற்றுவதற்கான நேரடியான வழியை நீங்கள் தேடுகிறீர்களானால், தயங்காமல் பயன்படுத்தவும் MindOnMap இலவச பின்னணி நீக்கி ஆன்லைன். இது ஒரு எளிய பயனர் இடைமுகத்தை வழங்க முடியும் மற்றும் சரிபார்க்கப்பட்ட பின்னணியை தானாக அகற்ற முடியும், இது பயன்படுத்த சிறந்த ஆன்லைன் கருவியாகும்.