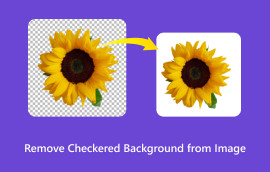
ஃபோட்டோபியாவில் பின்னணியை அகற்றுவது எப்படி [விரிவான முறைகள்]
நீங்கள் எடிட்டரா, படத்திலிருந்து பின்னணியை அகற்ற விரும்புகிறீர்களா? சரி, நீங்கள் படத்தின் பின்னணியை அகற்றுவதற்கு பல காரணங்கள் உள்ளன. பின்னணி இல்லாத படத்தை எடிட் செய்வது எளிது. நீங்கள் விரும்பினால், அவற்றை மற்றொரு படத்தில் இணைக்கலாம். நீங்கள் மற்றொரு பின்னணியையும் சேர்க்கலாம், இது பயனர்களுக்கு மிகவும் உதவியாக இருக்கும். எனவே, இந்த வழிகாட்டி இடுகையில், ஃபோட்டோபியாவைப் பயன்படுத்தி படத்தின் பின்னணியை எவ்வாறு அகற்றுவது என்பதை நாங்கள் உங்களுக்குக் காண்பிப்போம். இது உங்கள் முக்கிய நோக்கத்தை அடைய உதவும் ஒரு ஆன்லைன் கருவியாகும். மேலும், பின்னணியை எவ்வாறு மங்கலாக்குவது, பின்னணியைச் சேர்ப்பது மற்றும் பின்னணி வண்ணத்தை எவ்வாறு சேர்ப்பது என்பதை அறியவும் நாங்கள் உங்களுக்கு உதவுவோம். எனவே, இங்கே வந்து எல்லாவற்றையும் கற்றுக் கொள்ளுங்கள், குறிப்பாக எப்படி ஃபோட்டோபியாவில் பின்னணியை அகற்றவும்.

- பகுதி 1. ஃபோட்டோபியாவில் பின்னணியை அகற்றுவது எப்படி
- பகுதி 2. படத்தின் பின்னணியை அழிக்க சிறந்த ஃபோட்டோபியா மாற்று
- பகுதி 3. ஃபோட்டோபியா: புகைப்பட பின்னணியைத் திருத்துதல் [போனஸ்]
- பகுதி 4. ஃபோட்டோபியாவில் பின்னணியை அகற்றுவது பற்றி அடிக்கடி கேட்கப்படும் கேள்விகள்
பகுதி 1. ஃபோட்டோபியாவில் பின்னணியை அகற்றுவது எப்படி
ஃபோட்டோபியா மென்பொருளில் பின்னணியை எவ்வாறு அகற்றுவது என்பது குறித்த பயிற்சியைத் தேடுகிறீர்களா? இடுகை உங்களுக்குத் தேவையானதை வழங்கக்கூடியதாக இருப்பதால் நீங்கள் நன்றியுடன் இருக்க வேண்டும். உங்களுக்கு பயனுள்ள டுடோரியலை வழங்குவதற்கு முன், ஃபோட்டோபீயா என்றால் என்ன என்பதைப் பற்றிய யோசனையை வைத்திருப்பது சிறந்தது. ஃபோட்டோபீயா மென்பொருள் என்பது ஆன்லைனில் உள்ள மேம்பட்ட பட எடிட்டிங் மென்பொருளில் ஒன்றாகும். இது உங்கள் உலாவியில் பயன்படுத்தும் போது நீங்கள் அனுபவிக்கக்கூடிய பல்வேறு செயல்பாடுகளைக் கொண்டுள்ளது. இது அடுக்குகளைச் சேர்க்க, படங்களைத் திருத்த, வடிப்பான்களைச் சேர்க்க மற்றும் பலவற்றிற்கு உதவும். அதன் மூலம், ஃபோட்டோபீயா ஆன்லைன் இமேஜ் எடிட்டர்களில் பயன்படுத்தப்படும் என்று சொல்லலாம். படத்தின் பின்னணியை அகற்றுவது பற்றி பேசும்போது, நீங்கள் ஃபோட்டோபியாவை நம்பலாம். ஏனெனில் இது ஒரு சில கிளிக்குகளில் உங்கள் படத்தின் பின்னணியை திறம்பட அகற்றும். அதன் மேஜிக் வாண்ட் கருவி மூலம், உங்கள் புகைப்படத்தில் பின்னணி மற்றும் நீங்கள் விரும்பாத கூறுகளை அகற்றலாம்.
மேலும், நீங்கள் பல்வேறு இணைய தளங்களில் Photopea மென்பொருளை அணுகலாம். Google, Edge, Safari, Mozilla மற்றும் பலவற்றில் Photopea இல் பின்னணியை மாற்றலாம். எனவே, நீங்கள் எந்த தளத்தைப் பயன்படுத்தினாலும், உங்கள் படங்களைத் திருத்தலாம். இருப்பினும், Photopea ஐ இயக்கும்போது நீங்கள் தெரிந்து கொள்ள வேண்டிய ஒரு குறைபாடு உள்ளது. நாங்கள் குறிப்பிட்டுள்ளபடி, நீங்கள் ஆன்லைனில் பயன்படுத்தக்கூடிய மேம்பட்ட எடிட்டிங் பட மென்பொருளில் இந்த கருவி உள்ளது. சில பயனர்கள், குறிப்பாக ஆரம்பநிலையாளர்கள், கருவியைப் பயன்படுத்துவது கடினமாக இருக்கலாம். மேலும், அதன் பல செயல்பாடுகள் மற்றும் விருப்பங்கள் காரணமாக பயனர் இடைமுகம் குழப்பமாக உள்ளது. எனவே, நீங்கள் கருவியை இயக்க விரும்பினால், நிபுணர்களிடம் உதவி கேட்பது நல்லது. ஃபோட்டோபியா பின்னணி அழிப்பான் கருவியைப் பயன்படுத்தி கீழே உள்ள செயல்முறையையும் நீங்கள் அறியலாம்.
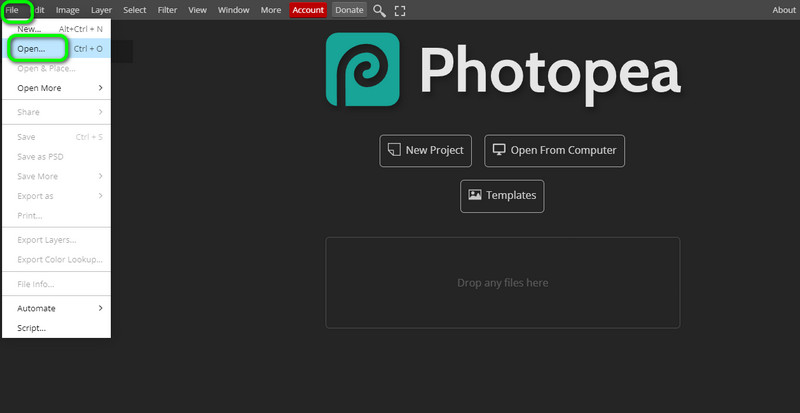
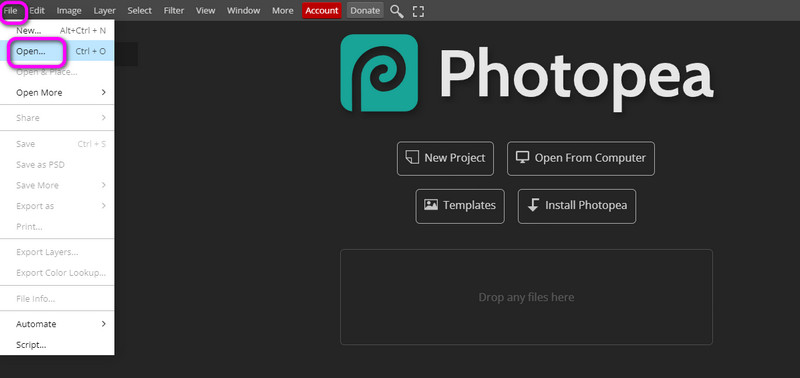
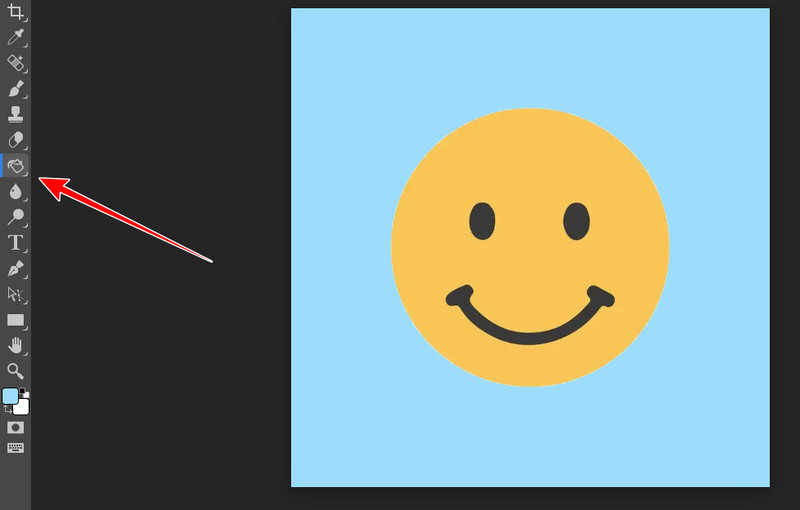
உங்கள் சாதனத்தைத் திறந்து இணையதளத்தைப் பார்வையிடவும் ஃபோட்டோபியா. பிரதான இடைமுகம் தோன்றும் போது, கோப்பு > திற விருப்பத்திற்குச் செல்லவும். பின்னர், உங்கள் கோப்பு கோப்புறையிலிருந்து நீங்கள் திருத்த விரும்பும் படத்தைத் தேர்ந்தெடுக்கவும்.
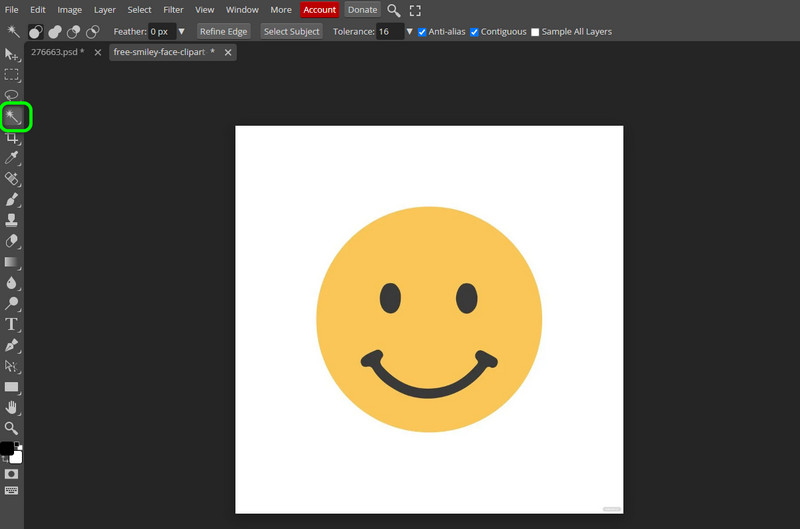
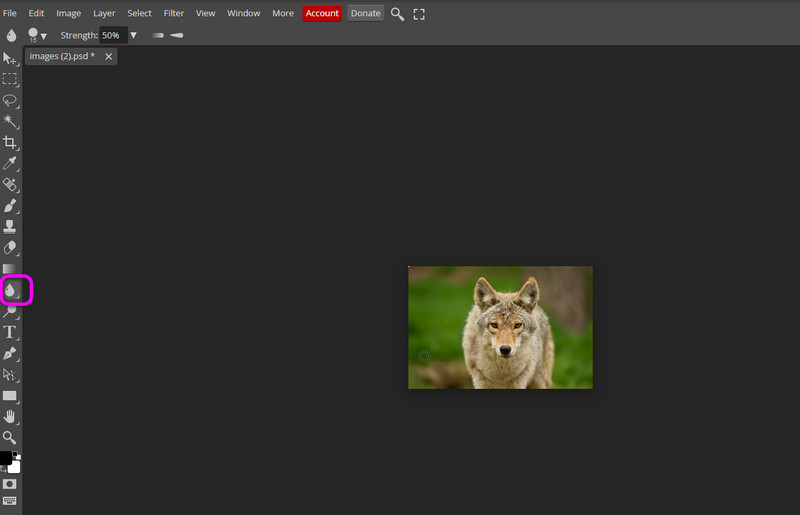
இடது இடைமுகத்திலிருந்து, மேஜிக் வாண்ட் கருவியைத் தேர்ந்தெடுக்கவும். பின்னர், புகைப்படத்திலிருந்து உங்கள் முக்கிய விஷயத்தைத் தேர்ந்தெடுக்க அதைப் பயன்படுத்தவும். சிறந்த முடிவைப் பெற, பாடத்தை விரிவாகத் தேர்ந்தெடுக்கிறீர்கள் என்பதை உறுதிப்படுத்தவும்.
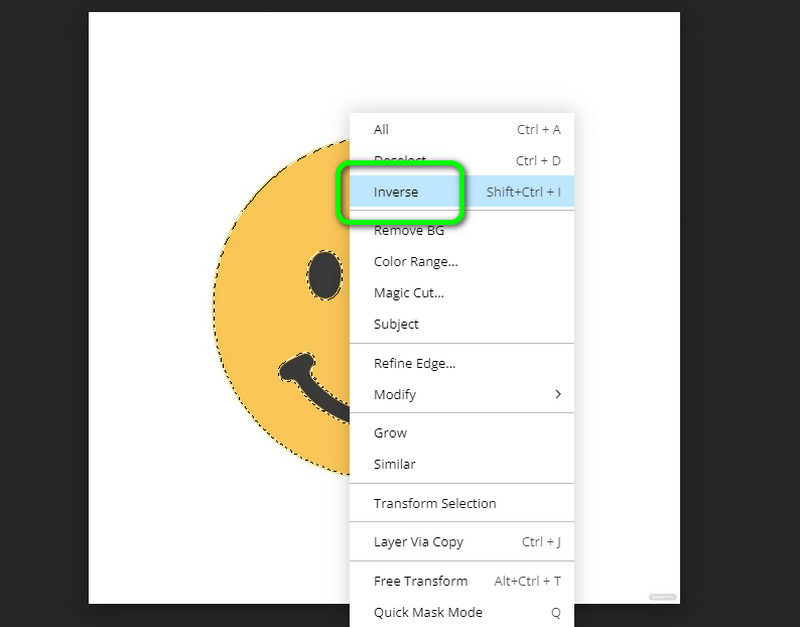
மேஜிக் வாண்ட் கருவியைப் பயன்படுத்தி முடித்ததும், படத்தை வலது கிளிக் செய்து, அதைத் தேர்ந்தெடுக்கவும் தலைகீழ் விருப்பம். பின்னர், உங்கள் விசைப்பலகையில் இருந்து நீக்கு விசையை அழுத்த வேண்டும். அதன் பிறகு, பின்னணி ஏற்கனவே அகற்றப்பட்டிருப்பதைக் காண்பீர்கள்.
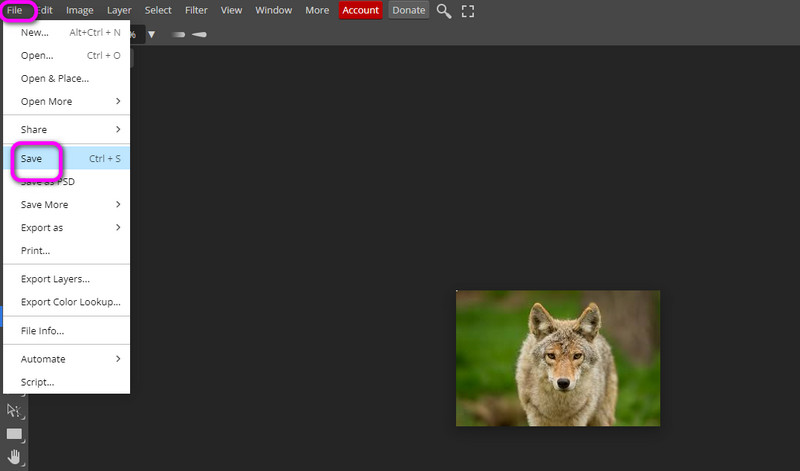
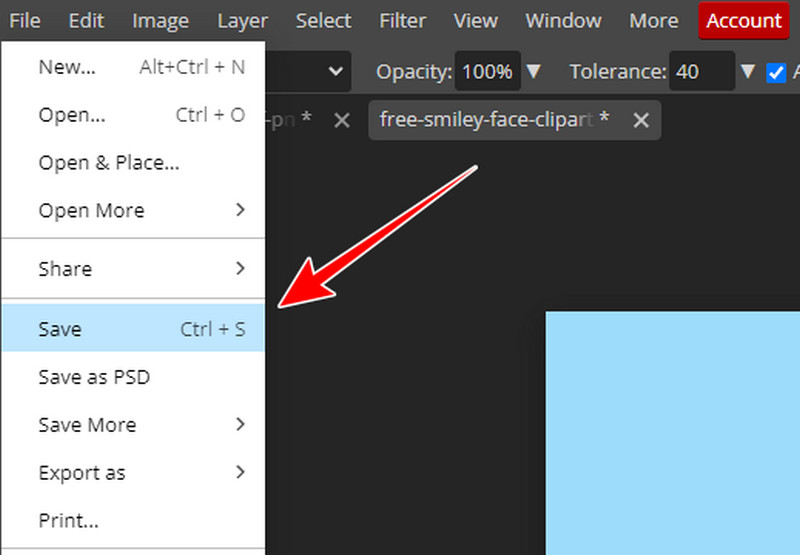
படத்தின் பின்னணியை அகற்றி முடித்ததும், படத்தைச் சேமிக்க வேண்டிய நேரம் இது. கோப்பு பகுதிக்குச் சென்று சேமி பொத்தானைத் தேர்ந்தெடுக்கவும். இது படத்தைப் பதிவிறக்கும், அதை உங்கள் சாதனத்தில் திறக்கலாம். Photopea புகைப்பட கட்-அவுட் பின்னணி மென்பொருளை எவ்வாறு பயன்படுத்துவது என்பது இப்போது உங்களுக்குத் தெரியும்.

பகுதி 2. படத்தின் பின்னணியை அழிக்க சிறந்த ஃபோட்டோபியா மாற்று
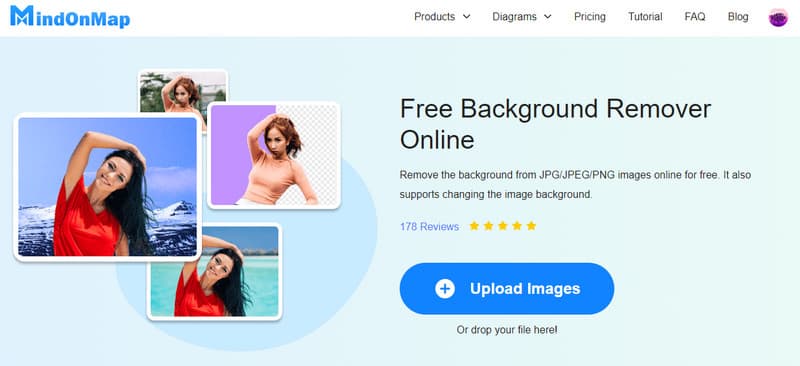
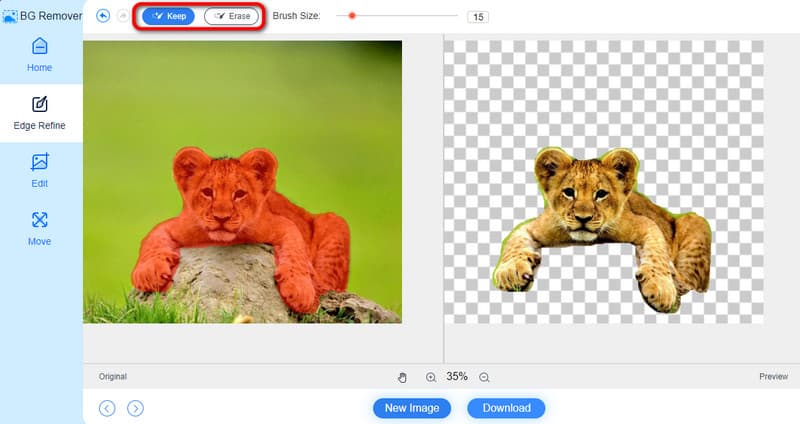
நீங்கள் ஒரு தொடக்கநிலையாளராக இருந்தால், ஃபோட்டோபியா உங்களுக்கு பொருத்தமற்றது. அதனுடன், நாங்கள் அறிமுகப்படுத்த விரும்புகிறோம் MindOnMap இலவச பின்னணி நீக்கி ஆன்லைன். நீங்கள் ஆன்லைனில் பயன்படுத்தக்கூடிய சிறந்த ஃபோட்டோபியா மாற்று இது. ஃபோட்டோபியாவுடன் ஒப்பிடும்போது இது எளிதான பின்னணி அகற்றும் செயல்முறையை வழங்குகிறது. மேலும், இது புரிந்துகொள்ளக்கூடிய பயனர் இடைமுகத்தைக் கொண்டுள்ளது, இது உங்களுக்கு சரியானதாக அமைகிறது. கூடுதலாக, நீங்கள் இரண்டு வழிகளில் படத்தின் பின்னணியை அகற்றலாம். Keep மற்றும் Erase செயல்பாடுகளைப் பயன்படுத்தி பின்னணியை கைமுறையாக அகற்றலாம். ஆனால் காத்திருங்கள், இன்னும் இருக்கிறது. பின்னணியை அகற்றுவதைத் தவிர, நீங்கள் பல வழிகளில் பின்னணியைச் சேர்க்கலாம். வெவ்வேறு வண்ணங்களுடன் பின்னணியைச் சேர்க்கலாம். நீங்கள் உங்கள் கணினியிலிருந்து உங்கள் படத்தைப் பயன்படுத்தலாம் மற்றும் உங்கள் மற்ற படத்திற்கு உங்கள் பின்னணியை உருவாக்கலாம். இதன் மூலம், கருவி அதன் பயனர்களுக்கு பயனுள்ள அம்சங்களை வழங்க முடியும் என்று நீங்கள் கூறலாம். எனவே, நீங்கள் இந்த Photopea மாற்றீட்டைப் பயன்படுத்த விரும்பினால், கீழே உள்ள விவரங்களைப் பார்க்கவும்.
செல்க MindOnMap இலவச பின்னணி நீக்கி ஆன்லைன் இணையதளம். பின்னர், உங்கள் கணினி கோப்புறையிலிருந்து ஒரு படத்தைச் சேர்க்க, படங்களைப் பதிவேற்று என்பதைக் கிளிக் செய்யவும்.
பின்னர், கருவி தானாகவே படத்தின் பின்னணியை திறம்பட அகற்றும். பின்னணியை கைமுறையாக அகற்ற, Keep மற்றும் Erase செயல்பாடுகளையும் நீங்கள் பயன்படுத்தலாம்.
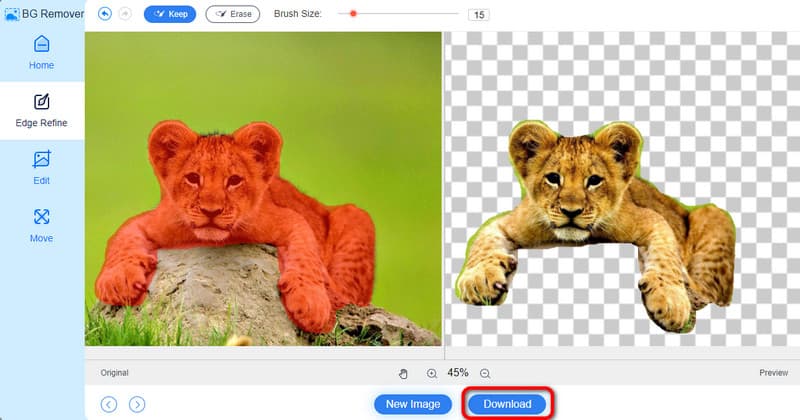
பின்னணி ஏற்கனவே அகற்றப்பட்டால், பதிவிறக்க பொத்தானைக் கிளிக் செய்வதன் மூலம் அதைச் சேமிக்கலாம். அதன் பிறகு, நீங்கள் ஏற்கனவே அமைத்துவிட்டீர்கள்!
பகுதி 3. ஃபோட்டோபியா: புகைப்பட பின்னணியைத் திருத்துதல் [போனஸ்]
ஃபோட்டோபியாவில் பின்னணியை மங்கலாக்குவது எப்படி
அணுகவும் ஃபோட்டோபியா உங்கள் இணைய உலாவியில். பின்னர், நீங்கள் மங்கலாக்க விரும்பும் படத்தைப் பதிவேற்ற கோப்பு > திற என்பதைக் கிளிக் செய்யவும்.
இடது இடைமுகத்திலிருந்து, மங்கலான கருவியைத் தேர்ந்தெடுக்கவும். அதன் பிறகு, உங்கள் கர்சரை அழுத்திப் பிடித்து, படத்தின் பின்னணியை மங்கலாக்கத் தொடங்குங்கள்.
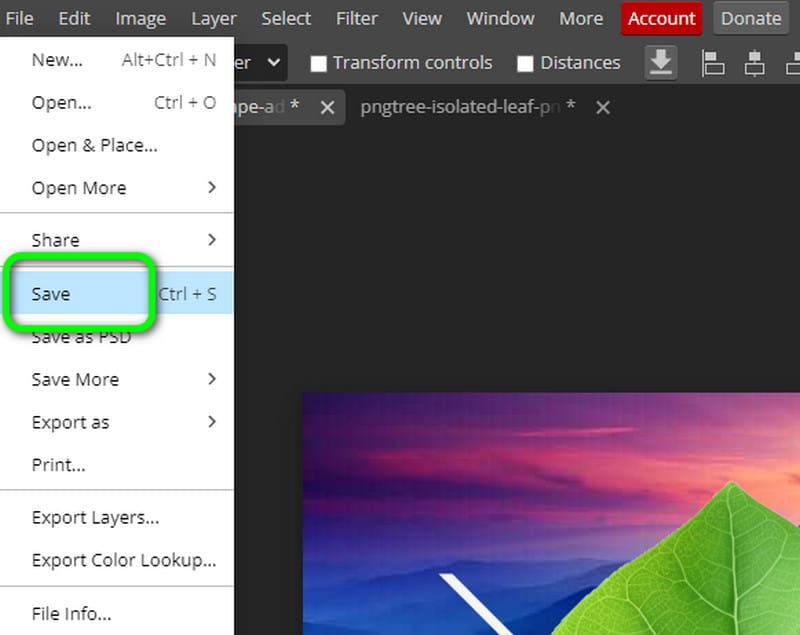
இறுதி வெளியீட்டைச் சேமிக்க, கோப்பு > சேமி விருப்பத்திற்குச் செல்லவும். பின்னர், அது உங்கள் கணினியில் பதிவிறக்கம் செய்யப்படும்.
ஃபோட்டோபியாவில் பின்னணியைச் சேர்ப்பது எப்படி
எப்படி என்று உங்களுக்கு ஏற்கனவே தெரியும் என்பதால் பின்னணியை அகற்று, பின்புல செயல்முறையைச் சேர்ப்போம். கோப்பு > திற விருப்பத்தை கிளிக் செய்வதன் மூலம் நீங்கள் செருக விரும்பும் படத்தையும் பின்னணியையும் பதிவேற்ற வேண்டும்.
பின்னணி இல்லாமல் படத்திற்குச் செல்லவும். பின்னர், படத்தை நகலெடுக்க Ctrl + C விசைகளை அழுத்தவும். அதன் பிறகு, பின்னணி பகுதிக்குச் சென்று Ctrl + V விசைகளை அழுத்தவும். இதன் மூலம், நீங்கள் படத்தை பின்னணியில் இணைக்கலாம்.
முடிந்ததும், உங்கள் படத்தில் நீங்கள் விரும்பிய பின்னணியை ஏற்கனவே வைத்திருக்கலாம். நீங்கள் முடித்ததும், பதிவிறக்கும் செயல்முறைக்கான கோப்பு > சேமி விருப்பத்தை கிளிக் செய்யவும்.
ஃபோட்டோபியாவில் பின்னணி நிறத்தை மாற்றுவது எப்படி
கோப்பு > திற என்பதற்குச் சென்று, இதற்கு பின்னணி வண்ணத்தைச் சேர்க்க விரும்பும் படத்தைச் சேர்க்கவும் புகைப்பட பின்னணி நீக்கி.
படத்தைச் சேர்த்த பிறகு, இடது இடைமுகத்திலிருந்து வண்ண விருப்பத்திற்குச் சென்று உங்களுக்கு விருப்பமான வண்ணத்தைத் தேர்ந்தெடுக்கவும்.
பின்னர், இடது இடைமுகத்திலிருந்து பெயிண்ட் பக்கெட் கருவியைப் பயன்படுத்தவும். கருவியைப் பயன்படுத்திய பிறகு, படத்தைக் கிளிக் செய்யவும், பின்னணி நிறம் தானாக மாறுவதைக் காண்பீர்கள்.
உங்கள் இறுதிப் படத்தைச் சேமிக்க, கோப்பு > சேமி விருப்பத்திற்குச் செல்லவும். பின்னர், உங்கள் கணினியிலிருந்து வெளியீட்டை நீங்கள் சரிபார்க்கலாம்.
பகுதி 4. ஃபோட்டோபியாவில் பின்னணியை அகற்றுவது பற்றி அடிக்கடி கேட்கப்படும் கேள்விகள்
Photopea பயன்படுத்துவது பாதுகாப்பானதா?
ஆம், அது. ஃபோட்டோபீயா செயல்பாட்டின் போது உங்கள் தரவைப் பாதுகாக்கும் திறன் கொண்டது. மேலும், இது உங்கள் தகவலை மற்ற பயனர்களுடன் பகிர்ந்து கொள்ளாது என்பதை உறுதிசெய்து, அதை நம்பகமான மென்பொருளாக மாற்றுகிறது.
ஃபோட்டோபியாவின் தீமைகள் என்ன?
இது ஒரு ஆன்லைன் எடிட்டிங் கருவி என்பதால், இதற்கு இணைய இணைப்பு தேவை. மேலும், இடைமுகத்தின் செயல்பாடுகள் மற்றும் விருப்பங்கள் குழப்பமாக இருப்பதால், ஆரம்பநிலைக்கு இது பொருத்தமற்றது.
Photopea முற்றிலும் இலவசமா?
மென்பொருள் முற்றிலும் இலவசம் அல்ல. இது உங்கள் படங்களை திருத்துவதற்கான இலவச பதிப்பை மட்டுமே வழங்குகிறது. ஆனால், அதன் முழுத் திறனையும் நீங்கள் அனுபவிக்க விரும்பினால், அதன் கட்டணப் பதிப்பைப் பெறலாம், இதன் விலை மாதத்திற்கு $5.00 ஆகும்.
முடிவுரை
எப்படி என்று தெரிந்து கொள்ள ஃபோட்டோபியாவில் பின்னணியை அகற்றவும், நீங்கள் இந்த இடுகையை நம்பலாம். நீங்கள் பின்பற்றக்கூடிய அனைத்து விரிவான வழிமுறைகளையும் இது வழங்க முடியும். மேலும், நீங்கள் ஒரு புதிய பயனராக இருந்து, பின்னணியை எளிதாக அகற்ற விரும்பினால், பயன்படுத்துவதற்கான சிறந்த மாற்று MindOnMap இலவச பின்னணி நீக்கி ஆன்லைன். இந்த ஆன்லைன் கருவியானது Photopea உடன் ஒப்பிடும்போது எளிமையான இடைமுகத்தைக் கொண்டுள்ளது, இது ஆரம்பநிலை மற்றும் திறமையான பயனர்களுக்கு ஏற்றது.